
Paper Negative
Info about paper negative Tips and Tricks
Posted by Bengt Köhler Sandberg 2013-07-28 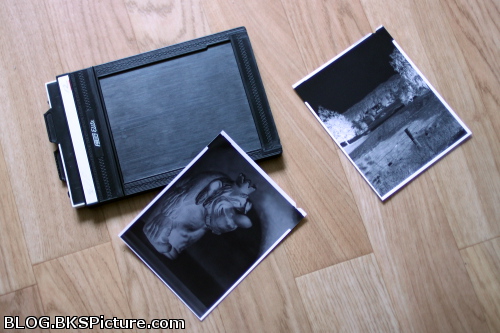 Most common is to use standard darkroom paper and use these in home built pinhole camera or even a large format camera. You will after a exposure end up with a negative on the paper unless you use positive paper which then will give you a positive image. I don't see the point in using positive paper for this use because you will still end up with a mirrored image. Better to instead do a contact print out of a negative which will not be mirrored and you can much easier get a correct exposure on your finished print. So why use paper instead of film? I started using this because I wanted to give large format cameras a go but didn't want to spend much money just to try. Darkroom paper is a lot cheaper and very easy to develop in a darkroom. So I bought a vintage Zeiss Ikon from the late 1920s which took 9x12 glass plates. Then used darkroom paper instead of glass plates which worked out fairly well. Focus however never got exactly where the ground glass showed but I next to only used this cameras outside and in good light conditions. Stopped down the lens as much as I could so I still got a sharp image even if I missed the focus a bit. I have now got myself a modern 4x5" cameras which can be used with standard film holder. But I still use paper for this and I find it a very good way to learn. And one learn mostly by doing and I would not shoot a fraction of the amount if I only used regular film. Get a good exposure One problem to use darkroom paper is that they don't come with a ISO number and you can't in a easy way know exactly how light sensitive your paper is. This can vary and thay have usually a much lower light sensitivity compared to film. The once I have tested have been around ISO 6 - 12. I have not tried that many brand and types but have good experience with Foma fomaspeed variant 312. The ISO of this paper is around 12 which is quite fast for a paper but it seems like this is not as sensitive when it comes to faster exposures times. And have had some under exposed shots with a shutter around 1/25s or faster. I have then exposed the paper after ISO 6 for faster shutters which have worked out very well. What can you do with your complet negative? You can use this as any normal negative. The most common way today is probably to scan it to get a digital copy in your computer. Any flatbed scanner which can take the papers size can do this and you don't need one that are made for negatives. But the scanner software can probably just scan the image as it looks. Meaning that your scanned image will be a negative image. This can be easily be changed in most image software like Gimp or Photo shop. It's usually called invert colors or just invert. For darkroom printing is easiest to do a contact print. I have done a own post about contact printing which you can find here. It is also possible to do a enlarged darkroom copy as well. But this is not as easy as a normal film negative and you need a lot longer exposure for this to work. Have a more detailed post about enlarging a paper negative here. Paper brands and types You can use any brand or types for this but some are more suited than others. The problem that I have come across is mainly that the paper don't what to stay flat. They can buckle outwards in the film holder and the focus point will not be in the same place as your cameras ground glass show. This is not a problem on a pinhole camera but can be a big one on a large format. I have mostly used Foma fomaspeed variant 312 which have worked very well. Usually need to gently bend the paper a little so the papers emulsion side don't buckles outwards when I first load it into the film holder. And have after this next to always stayed nice and flat for the exposure. One downside that I have found to this paper is that it's not very good at a ordinary scan from a flatbed scanner. At least not on my Epson V700. It have given a lot of small white dots which then became black after inverting the colors. This is visible when you look closer on a hi res scan. I would guess that these white dots are reflections that the papers surface makes from the scanners light source. My scanner can however scan large format film negatives and I have had very good result by scanning this paper as a normal negative. Meaning that the light source lights true the paper instead of directly onto. Image quality any good? I must say yes you can get very good image quality. This picture is a 4x5"
negative and is taken with a Schneider - Kreuznach /
Repro - Claron 210mm f/9.
Aperture is set at f/90
so sharpness is not at it's top.
But I'm very impressed
how sharp this lens are even at this small aperture.
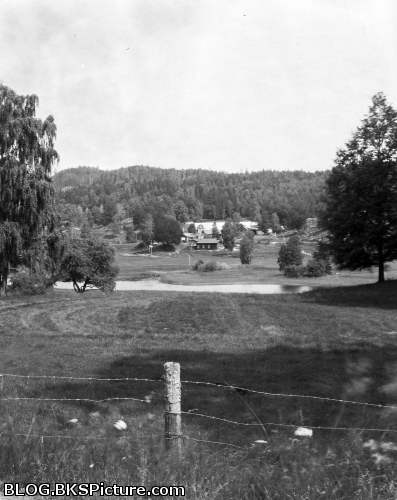 It is scanned at 3200dpi
which gives a 166 mega pixel image.
I then usually downsize
the finished print to a max of 100 mp.
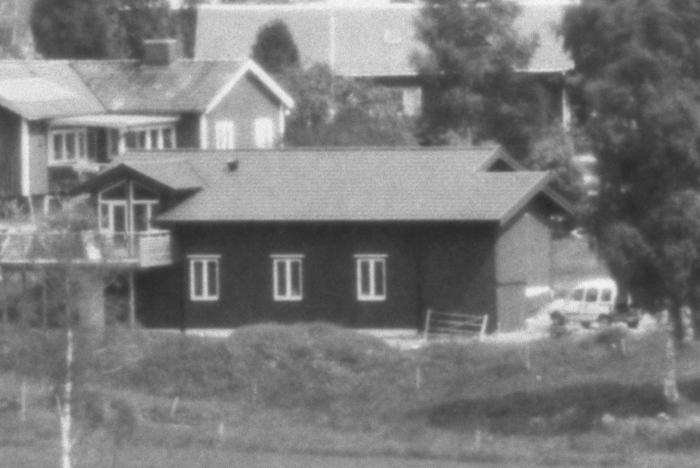
Have here heavily cropped
this to shows the small houses that are in the middle of
the picture.
And it's directly from
the scanner and I don't add any sharpening and also turn
off the auto sharpness which most scanner software adds.
 But you do usually need quite long exposures and camera shakes caused by wind can easily ruin some of that sharpness. Downsides The more obvious ones would be the low light sensitivity but this can also be a good thing as well. But I have also found these to have quite low tonal range or dynamic range. Meaning the range when the paper start to get exposed till the image get over exposed and disappear. This can make dark parts of the image very dark like shadows. While to bright things gets lost by overexposure. Can be a problem sometimes especially in direct sunlight. This also makes these quite sensitive that you get the right exposure. But the range can vary depending on your paper and developer. Here is a example where
I did not use any filters and how this can look.
This screen when I tool the image had one white fluffy cloud just over the houses at the distance. I used a long exposure so the cloud did move a little during this time but not by that much. The exposure is set after the grass field and the sky will then be overexposed. A normal b&w film would have a very bright sky but you would still have some details in the sky. But here the sky is so overexposed that there are not a single little trace of this cloud on the negative. I guess that this little cloud looking sky that you see in this darken image comes from the paper. And because that I scanned the paper as a regular negative.  You can however use color filters to achieve more detail in the sky etc. And you can read more about that here. That was all for this, but I also have some related posts about paper negative use: Info about paper negative Better results with Paper negative Enlarged darkroom print from a paper negative How to get the paint effect Want
to help me out?
Make my site known by sharing it with your friends and family. This helps and would be really appreciated, thanks!
My facebook page

|
 |