
Darkroom
Develop B&W Film or Paper Tips and Tricks
Posted by Bengt Köhler Sandberg 2013-06-16 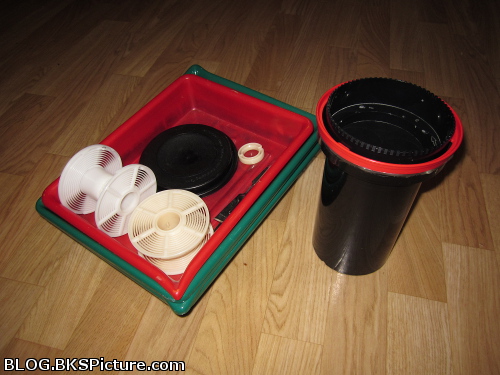 Developing B&W Film and darkroom paper is done with the same process and types of chemicals. You put the film or paper in three different chemicals and then end with washing and drying. Quite easy and most can do this from home. So which chemicals and what order do you do things? 1: Developer 2: Stop 3: Fix 4: Washing 5: Drying (You can read in more detail further down) The temperature of the chemicals are also important, especially for the developer. And a higher temperature will give a faster developing time. It's most common to use 20° C. Chemicals should also agitated with some intervals. This is done to avoid uneven development. For film I usually just turn film tank upside down and hold it there until the bubbles stops. Flip it back again and wait for the bubbling to stop again. Bang the filmtank gently once or twice so you remove air bubbles that can build up on the film. I do this once every minute and it takes about 10 sec. Agitating during paper development is just to slightly lift one or two sides of the tray so the chemicals move around. This can be done during the hole bath. What do you need to be able to develop film or paper? Film: - Something to develop your film in. For normal 135 or 120 film you usually use a Film Tank with a film reel. You put the your roll into the film reel and place it in the tank. This must be done in complete darkness and I use my bathroom for this. But you can turn on the light when this is done and you have closed the film tank. - Something to keep the time so you know when you should change chemicals. - Water to wash the film. - Somewhere to hang your film to dry. And also film clips which you snap on to the beginning and the end of the film. These film clips are used to keep the film straight when it's drying. 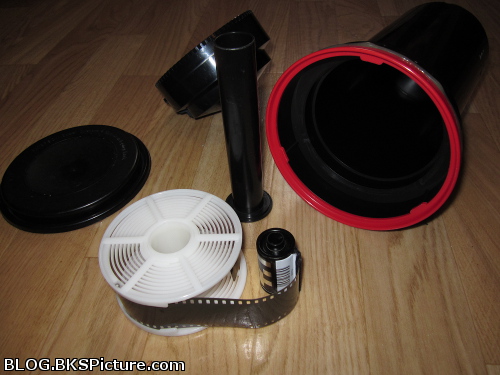 Paper: - At least three trays which are big enough for the papers that you use. One for the developer, stop and fixer. - Might need one tray for washing the print depending on how you can do this. - Print tong or something to pick up the print when it's in a bath. Should be one tong for every tray with chemicals. You can use your hands but that's not very recommended and it's important that you don't get any stop or fix in your developer bath. - Safelight. This is of course not a must and you can develop in complete darkness but that's not the easiest. - Something to keep the time so you know when you should put the paper in the next bath. Not a must of course but good to have. 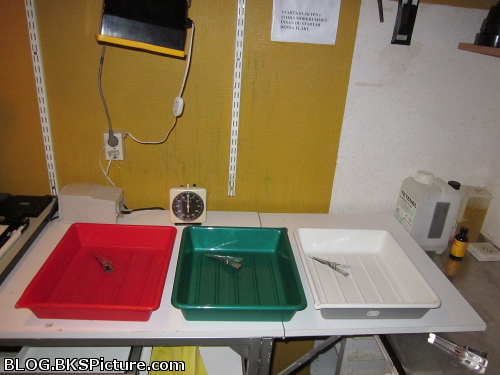 So where can you get a hold of all these things? Well that depends on where you live. But I buy most of my film and chemicals from a German online store. http://www.macodirect.de/index.php I have very good experience of this store and they have quite a lot for your analogue needs. But things like this are also something you often can find very cheap used. Ebay, secound hand stores etc. can be a very good place for equipment like trays, enlarges, lenses etc. But I would usually not buy any old darkroom paper or film there, especially it have been opened. Many don't have a clue what it is and it's a good chance that it's ruined. These things also don't last forever and it depends a lot on how they have been stored. Developer This develops the film or paper. The developing time depends on the type of film, paper and developer combo. There are different developers for paper and film. Darkroom paper is very easy and hard to get wrong. A standard darkroom paper can be used under so called safelight. This is a red light which the papers emulsion is not sensitive to. Most common to develop these in simple trays and you can see the hole process. Developing time is often 1-2 min and the paper will not get darker when the developing is done. But leave the paper way to long and you will probably get at foggy image where you white are gray. Film on the other hand can usually not be exposed to safelight without ruin it. And these must be handled in complete darkness. Film developing time very a lot depending on the film and developer used. There is a very good site which have tons of info for most film and developer combos. http://www.digitaltruth.com/devchart.php Why are there different developers for paper and film? There are often not that much difference between film and paper developer. But a paper developer are way faster and gives shorter developing times. And that's not a good thing for film because you can get a uneven development that way. You apparently often get a way grainier negative. It can also be hard to find any info on how long developing time that should be used. Film developer for paper often work very well but you will then have a longer developing time. Which is around 5 min instead of 1-2 min. The developer will also get exhausted faster and you can't use it for as many prints. Stop This is used to quickly stop the developer. The film or paper only need to be soaked for around 15 sec to completely stop the developer. You use the same stop chemicals for both film or paper. The fix bath will also not be exhausted as quickly when you use a stop bath. But I find the stop bath to be more important to be used on paper then film. I do a thorough washing with water on my film instead of using stop. This is not as good and it takes longer time to stop the developer. You also only use the chemicals once for film and you will not exhausted the fixer. Fix This stops the film or paper to be sensitive to light. So you can expose the film or paper to normal light after the fix bath is done. You use the same fix chemicals to both film or paper. The fix time depends on the type of film, paper and fixer combo. But the fixer usually comes with good instructions how long time you need etc. Double fix bath? Have read that you should in some cases use two separate fix bath. This is for papers only and mainly those that use Fiber papers. And a double fix bath can be important to get a more archival safe print which could last longer. Washing A thorough washing is very important for both paper and film in the long run. And fix chemicals left on a print can leave some really ugly marks which can ruins it. This will not be visible at first at it can take years before it start to show. So it's better to over do it to be on the safe side. There are no lack of things one can buy to help wash paper or film. But it don't have to be anything fancy and these are usually just to do it faster and easier. I often just use my shower hose for my film. Hold it by hand into the film tank and let the water go for a minute or two. Leave it for some time and then repeat a couple of times before I hang them to dry. For papers I fill up a tray with water, place the paper on the surface and then just let the water running onto the print. Very simple but works very well. 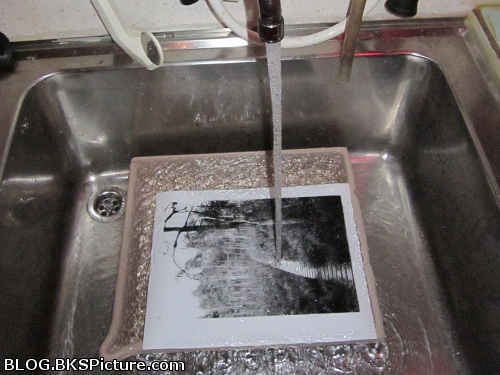 Drying It sound easy and what can go wrong here. First of all is dust which is one problem that are not fun to correct afterwards so it's always good to use a space which is as dust free as possible. The least dusty space in most homes is usually the bathroom because of the steam made from a hot shower. This makes so the dust gets heavy and don't fly around which means less dust on your film. Second is drying marks or spots which can ruin a shot if unlucky. This marks gets formed when regular tap water is left to dry on it's own. Bubbles will get form on the surface and it's a good chance the bubble will leave mark or spot. But there are some ways to fix this problem.  There are two common ways to fix this problem when drying film at home. You can remove the excess water before they have the chance of leaving any marks and there are some ways to do that. There are film squeegee which is made for this but I have found that these can quite easily scratch the film so I would not recommend these. Something similar which I found to work better is to take a damp and clean dishcloth, fold it so it goes around both sides of the film. Run it one or two time true the film which removes the formed water bubbles. Have used a non fabric dishcloth which is more like a sponge. But this can add some extra dust on your film so it's not perfect. Another way to remove excess water it to blowing them off with a rubber blower. This works quite well but it's quite easy to miss formed bubbles and can be quite the work out when you have many films to dry. The second way is to add a extra bath to your film after washing. This is a batch in distilled water plus a wetting agent. Distilled water is just 100% water and lacks any minerals and salt etc. which is it why tap water can leave these marks. A wetting agent change the surface tension of the water which also reduce the chance of drying marks to be formed and it also make the film to dry faster. And this extra bath usually works very well. Drying paper are a little more simple and I use a squeegee which very easy and works great. Put the paper on a flat clean surface and then run the squeegee 2-3 times till the excess water are gone. You can use a normal window squeegee but I have found that some can leave marks on the paper. Then it's just to leave the print to self dry or you can use a hair dryer to speed this up. 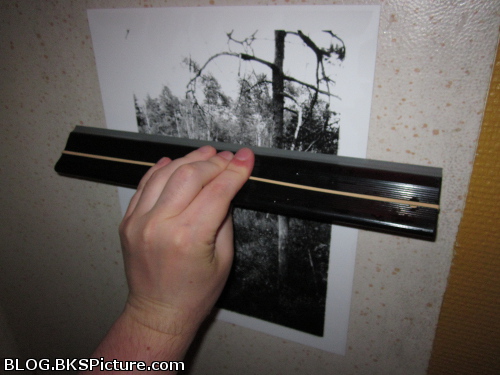 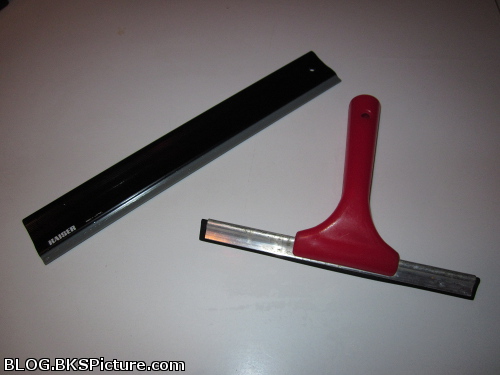 Develop B&W Film or Paper Want
to help me out?
Make my site known by sharing it with your friends and family. This helps and would be really appreciated, thanks!
My facebook page

|
 |